Monday, June 29, 2009

Extra Healthy "Moomies Buns"


Moomie's Sandwich Buns ~ a Healthier Version


Moomies buns have been around for many years, they have long been my "go to" recipe for sandwich and hamburger buns (I have always reduced the sugar to 1 Tablespoon as we prefer a non-sweet sandwich bun.) The original recipe is from The King Arthur Flour website.

Since we have been steering away from white flour, and attempting to incorporate more whole grains into our diet I experimented to make the original Moomie's buns more healthful.

Below is the original Moomie's Bun recipe, as well as the changes I made. The whole grain method will produce buns which are denser and heavier than those made with white flour. If you are looking for a more nutritious bun recipe you may like this one ~ I plan on experimenting with different flours and will share the recipes if I find some I like better than this variation.

Moomie's Legendary Sandwich/Hamburger/Hot Dog Buns
(The original version)

Ingredients

1 cup water
2 tablespoons butter
1 egg
3 1/2 cups flour all purpose
1/4 cup sugar (I always reduce this to 1 scant tablespoon)
1 teaspoon salt
1 tablespoon instant yeast

Directions

The dough can be made in either a bread machine, a food processor or stand mixer. (I use my bread machine)

Place all ingredients in bread machine. Select dough cycle. When cycle is complete place dough on a lightly floured surface.

The following are Moomie's instructions ~

Divide dough into 8 pieces. With each piece, slap into a bun shape. Usually four or five slaps will do it. Place on greased cookie sheets , cover; allow to rise for about 30 to 40 minutes.

Bake in preheated 375°F oven for 12 to 15 minutes till golden. Cool on wire racks.

Moomie likes to add a teaspoon of onion powder and about 1/2 teaspoon dried onion to the dough in the bread machine. It adds a light onion flavor.


~~~~~~


Here are the changes I made to make these healthier for our lifestyle change:

2 tablespoons olive oil for the butter
egg substitute for the egg
1 tablespoon molasses for the sugar


I substituted the following for the 3 1/4 cups white flour:

1 1/2 cups whole wheat white flour
1 cup whole wheat flour
1/2 cup dark rye flour
1/4 cup flax meal

You may find that a little more water is needed because of the density of the whole wheat flours. For portion control reasons I make these buns much smaller than regular size sandwich/hamburger buns (about 1/4 to 1/3 of the size.)

For the seed topping:

After the final rise I brushed the top of the buns with egg substitute and sprinkled some with caraway seeds and the others with Artisan bread topping (available from King Arthur Flour), or you can make your own blend. Their blend consists of Sesame seeds, flax seeds, black caraway seeds, sunflower seeds, poppy seeds, and anise seeds.

Please click HERE to return to Once Upon a Plate


Thursday, June 25, 2009

Healthy Blueberry-Oatmeal Muffins with Flax Meal


This is a combination of recipes; The American Heart Assn., Bob's Red Mill, and Diabetic Magazine.


Low Fat Oatmeal Blueberry Muffins
12 regular size muffins

1 1/4 cups whole wheat flour
1 1/4 cups rolled oats (or 1 cup rolled oats, plus 1/4 cup flax meal, or oat bran)
1 teaspoon baking powder
1/2 teaspoon baking soda
1/4 teaspoon salt (I omit)
1/2 teaspoon cinnamon
1 cup unsweetened applesauce
1/2 cup low-fat buttermilk
1/2 cup firmly packed brown sugar (I use 2 Tablespoons Brown Sugar Splenda (TM)
2 tablespoons canola oil
1 large egg, lightly beaten (I use 1/4 cup egg substitute)
3/4 cup blueberries (fresh or frozen)


Preheat oven to 400 degrees.


Line a 12 cup muffin tin with paper cases or spray with nonstick cooking spray.


In a large bowl combine flour, oats, baking powder, baking soda, salt and cinnamon. In a medium bowl combine applesauce, buttermilk, sugar, oil and egg. Make a well in dry ingredients and add applesauce mixture. Stir until just moist. Fold in blueberries. Fill muffin cups 2/3 full.


Bake for 16-18 minutes.


Allow to cool in muffin tin for 5 minutes or so, then cool on rack.
Note: These muffins freeze beautifully.


Click HERE to return to Once Upon a Plate

Monday, June 22, 2009

Grilled Snapper with Avocado-Strawberry Salsa

Pan-Grilled Snapper with Avocado-Strawberry Salsa
Yield: 4 servings (recipe is easily halved)

1 jalapeño pepper, finely chopped
1 ripe avocado, diced
2 cups strawberries, finely diced (for 2 servings I used about 3/4 cup)
1/4 cup red onion, finely diced
2 tablespoons cilantro, finely chopped
1 teaspoon fresh lime juice (in addition I offer extra lime slices)
1/4 teaspoon sugar (I omit)
sea salt to taste

4 6-ounce snapper fillets
1 tablespoon olive oil
1 1/2 tablespoons fresh lime zest

For the salsa:
Stir jalapeño, avocado, strawberries, onion, cilantro, lime juice, sugar, and sea salt together in a bowl. Cover and set aside. Salsa may be made several hours ahead and chilled.

Note: If making ahead, add the sugar, salt and avocado just before serving.

To cook the fish:
Preheat stove-top grill pan over high heat. Pat fillets dry then brush both sides with the oil; sprinkle with the lime zest. Lay fillets on grill pan skin side down and cook 4-5 minutes on each side, turning once, until cooked through.

Transfer fillets to serving plates and top with avocado-strawberry salsa.

Nutritional Value Per Serving: Calories 440, Calories From Fat 117, Total Fat 13g, Saturated Fat 2g, Trans Fatty Acid 0g, Cholesterol 63mg, Total Carbohydrates 40g, Protein 37g, Omega 3 Fatty Acid 0.06g


Recipe adapted from the Florida Department of Agriculture.

Click HERE to return to Once Upon a Plate

Saturday, June 20, 2009

Spinach Tortillas


These are fun to make (and eat!) They can be used for dipping in salsa or guacamole, or making enchiladas, wraps or quesadillas.


To shape them you can either roll them with a rolling pin or use a tortilla press (I use an Indian Chapati maker *, similar to a tortilla press). For easy removal from the press I place the dough ball between 2 sheets of sturdy plastic food freezer bag ~ (I take one bag and split it open on 3 sides, like a book.)

* Click HERE to see the Chapati maker.


Spinach Tortillas

16 tortillas (I usually halve this recipe)

3/4 cup hot tap water

1/2 10-ounce package no-salt-added froxed spinach, thawed, drained and squeezed

1 cup all-purpose flour (I use whole wheat)

1 cup masa harina (find it along with other flours in the market)

1 tablespoon olive or canola oil

1/4 teaspoon salt (I omit)

Flour for shaping the tortillas (and for flouring the board if you are rolling out with a rolling pin)

In a food processor or blender, puree water and spinach, add remaining ingredients and pulse until a ball forms (add a little more flour if mixture is to wet.) With floured hands form dough into a ball, either leave in processor bowl with lid on, or wrap in plastic. Allow dough to rest for 15 minutes.

With your floured hands on a lightly floured surface roll into a rope shape about 16 inches long. Cut cross-wise into 16 one-inch pieces. With your hands roll each into a ball. Roll each cylinder into a ball.

Preheat a non-stick pan or griddle (or seasoned cast iron pan or griddle) over medium heat.

With a rolling pin on a lightly floured surface, roll each ball into a 6-inch thin round pancake (as close to round as you can make it, it doesn't really matter.) OR, place dough ball between the plastic film as described above, and press in the tortilla press. Remove from plastic carefully to avoid ripping; peeling the plastic from the raw tortilla.

Cook on the griddle or pan for 1 to 2 minutes. Turn tortilla over, pressing down about 10 seconds with a flat spatula, cook for 1 to 2 minutes. As they are done remove tortillas to a plate or cooling rack.

Store in an airtight plastic bag in the refrigerator for up to 5 days or in the freezer for up to 4 months.

To reheat, wrap tortillas in Aluminum foir and heat in a 350* (F) oven for 5 minutes or until heated through. Or put tortillas on a microwave-safe plate, cover loosely with plastic or damp paper towel and microwave for 30 seconds to 1 minute, until heated through.


Yumm! Homemade tortillas!

(Recipe adapted from "The New American Heart Association Cookbook")


Please click HERE to return to Once Upon a Plate.


Thursday, June 18, 2009

Egg Foo Yung ~ Vegetable or...


A take on a more complicated dish from Shanghai, Egg Foo Yung has been a very popular menu item on Chinese-American restaurant for decades.

This is the recipe I've used for many years; my hints to lighten it up for a healthier version are noted.

Egg Foo Yung
4 servings

Ingredients:
Egg pancakes:

4 eggs (I use 1 cup of refrigerated egg substitute such as Egg Beaters (TM))
2 cups mung bean sprouts, broken into bite-size pieces
1/4 yellow or white onion, medium dice
1 green onion, sliced (plus extra for garnish, if desired)
2 tablespoons all-purpose flour (I use whole wheat pastry flour)
1/4 teaspoon salt (I omit)
1/4 cup vegetable oil (I omit, instead cook the pancakes in a non-stick frying pan, sprayed with cooking spray)

Gravy:

2 tablespoons vegetable oil (I reduce a bit)
2 tablespoons flour (I use whole wheat flour)
1 cup chicken broth; homemade or canned (I use Pacific Natural Foods brand; low-sodium, in the carton)
1 tablespoon Chinese Oyster Sauce
1 teaspoon dry sherry (not cooking sherry)
1/4 teaspoon salt (I omit)
1/4 teaspoon ground white pepper

Directions:

Combine egg pancake mixture, mix until well combined.

Heat large skillet over medium heat until hot. If using oil add 2 tablespoons & allow to heat, alternately spray with cooking oil spray. Ladle mixture into 4 mounds in the skillet. Gently flatten each mound with a spatula. Cook until bottom is brown, flip (and remaining 2 tablespoons oil---if using.) Continue to cook about 5 to 7 minutes until egg mixture is cooked though.

For the gravy:

Mix oil and flour in a small pot, cook over moderate heat to make a roux. Gradually whisk or stir in broth along with remaining gravy ingredients, cook until desired gravy consistence is reached.

Optional gravy add-ins ~ Diced, cooked vegetables, bay shrimp, cubed cooked chicken, or other meat such as Chinese BBQ pork, etc.

To serve: Plate egg pancakes, spoon sauce over all. Serve hot and enjoy!


Wednesday, June 17, 2009

Baked Kale Crisps

Some will turn their nose up at these, others love them. They may remind you of toasted nori (sea weed). They are a low calorie nutritious snack, and a decent substitute for potato chips, though not sturdy enough for dipping.


Baked Kale Crisps


Ingredients:

1 bunch curly kale
1 tablespoon olive oil ( I use WAY less, see below)*
You may sprinkle with soy sauce/tarmari/low sodium-soy sauce but ~

I prefer either to spritz very lightly with Bragg Liquid Aminos before baking, OR sprinkle VERY lightly with a few grains of coarse sea salt immediately after baking. You may also like a dusting of ground cayenne pepper or chipotle with the salt.


Directions:


Preheat an oven to 325 degrees F. Line a non insulated cookie sheet with parchment paper.

With a knife or kitchen shears carefully remove the leaves from the thick stems and tear into bite size pieces (try to strive for uniformity in size so they will crisp evenly.)

Wash and thoroughly dry kale with a salad spinner. * Spritz kale with olive oil (I use a Misto (TM) spritzer), or alternately olive oil cooking spray.

Bake until the edges lightly brown but are not burnt, 10 to 15 minutes, turning once half way through baking. If smaller pieces turn crisp before the larger ones I remove them earlier.


Sprinkle evenly with a few grains of coarse sea salt, and ground hot pepper if desired.


Monday, June 15, 2009

Pacific Rim Tofu Salad ~ Vegetarian & Vegan Friendly


I found a version of this recipe on Recipezaar, but (as usual) I changed a few things around to suit our tastes.


Pacific Rim Tofu Salad
2 servings (Easily doubled)

Ingredients:

1 T oil, 2 ½ teaspoons water
1 tablespoon [unseasoned] rice vinegar
1/2 tablespoon honey (or 1 teaspoon Splenda, or to taste)
1 teaspoon reduced sodium soy sauce
1/2 teaspoon toasted sesame oil
½ to 1 teaspoon fresh ginger, minced or grated with a micro-plane
1 clove garlic, minced
1/4 teaspoon salt (I omit)
1/2 (14 ounce) package extra firm tofu, rinsed, patted dry and cut into domino size pieces, or cubes or "sticks"
2 to 4 cups mixed salad greens
1 medium carrot, peeled, shredded or sliced
1/2 large cucumber, sliced or cubed (I use English, or Hot House cuke) sliced thinly with a mandolin
A few radishes, sliced with a mandolin (optional)
Sesame seeds for garnish, if desired


Directions:


Whisk canola oil, vinegar, sweetener of choice, soy sauce, sesame oil, ginger (and salt, if using) in a bowl.
Place tofu and 1 tablespoons of the dressing in a large nonstick skillet. (I spray the pan with a quick hit of cooking oil before adding the tofu.) Cook the tofu over medium-high heat, turning every 2 to 3 minutes, until golden brown, 5 to 15 minutes (until as deeply colored as you like.) Remove from the heat, add 1 ½ teaspoon of the dressing to the pan and stir to coat.

Either toss greens, carrots and cucumber with the remaining dressing, or arrange salad components on dish and drizzle with dressing. Top with the warm tofu.


Best served as soon as assembled.

Please click HERE to return to Once Upon a Plate.

Saturday, June 13, 2009

5-Star Portobello "Pepper-Steak" ~ Vegetarian


Five Star Portobello "Pepper-Steak" ~ Vegetarian


2 to 4 servings

Ingredients:

2 to 4 cloves minced garlic
1 large onion, cut into slim wedges from stem to root end
water or broth for sauteeing (I use Pacific Natural Foods brand low sodium chicken broth)*
1 large green bell pepper, sliced into approximately 1/4-inch strips
1 medium red bell pepper, sliced into approximately 1/4-inch strips
1 or 2 large (4-6" diameter) portobello mushrooms (or a few shitake mushrooms, thickly sliced)
I use portobellos, sliced approximately the same size as the bell peppers
2 Tablespoons no salt added tomato paste
Fresh oregano and/or thyme; I like lots of herbs~ use as much or as little as you like, plus extra for garnish (May use dried, start with a scant teaspoon if using dried.)
Low sodium soy sauce to taste (about 2 to 3 teaspoons, or less --to your taste)
hot sauce, cayenne pepper or hot pepper oil to taste (I use Chinese Chili Oil ~a little goes a long way)
freshly ground black pepper to taste

Method:

In a large non-stick skillet over medium high heat, saute the minced garlic and onion in broth or water until onions are translucent. Add the red and green bell peppers and mushroom slices and cook for about 5-10 minutes, or until mushrooms release their liquid.
Add the remaining ingredients and mix well.

I serve this with steamed brown rice.

Adapted from kwvegan


*Use water to keep this Vegan acceptable.


Saturday, May 30, 2009

Tomato-Olive & Fresh Herb Relish


This delicious fresh relish has evolved over the years from a few recipes I used to make. The original sauce was actually served warm from the pan the fish was cooked in, but when the tomatoes are flavorful I like to serve it uncooked so the ingredients are fresh and vibrant.

It is wonderful on fish, chicken, chops , spread on grilled toasts, or mixed with pasta for a light and refreshing sauce.

It's terrific with halved cherry tomatoes. Swap out green olives for the black olives (I used Nicoise olives, but Kalamatas are really good, too. If you don't have pitted olives, just smash the olives with the flat side of a wide knife blade; the pits will come out easily.) Use whatever fresh herbs you happen to love. Substitute red wine vinegar for the lemon juice if you prefer. This recipe is easily doubled or tripled, etc.

Tomato-Olive & Fresh Herb Relish

2 medium tomatoes, finely diced to equal about 1 cup (I cut the tomatoes in half, remove the seeds and gel and discard before dicing the tomatoes)
1/4 cup finely diced red onion
1/4 cup chopped ripe olives
1 Tablespoon capers, rinsed (optional)
2 tablespoons fresh lemon juice
A generous tablespoon of your favorite herb, chopped (or just use the tender leaves)
2 teaspoons olive oil
1/8 teaspoon salt, or to taste
Freshly ground pepper
1 large garlic clove, minced

Gently stir all ingredients together in a medium bowl until well combined. Use immediately, or store in refrigerator until serving time.
You can make this up to one hour prior to serving (covered and refrigerated), but much longer than that and the sauce loses it's delightful fresh flavors.

Friday, May 29, 2009

Snickerdoodle Cookies ~ A Classic


A fun name for a delicious cinnamon & sugar cookie with a crispy-crackly outside and tender slightly chewy buttery center. I don't know when my mother first began making them; but her handwritten recipe card definitely out dates me! They are just as delicious with a glass of icy cold milk as they are with coffee, or iced or hot tea.
Apparently the recipe dates back to the 1800's, and is probably of Dutch or German origin.

Snickerdoodle Cookies
2 and 3/4 cups all purpose flour
1/2 teaspoon salt
2 teaspoons baking powder
1 cup butter, room temperature (you can use unsalted, but I don't)
1 1/2 cup granulated white sugar
2 large eggs
1 teaspoon pure vanilla extract

Topping ~
3 Tablespoons white granulated sugar
1 Tablespoon fragrant Cinnamon (I use Vietnamese)
Directions
Preheat the oven to 350 degrees (F)

Sift the flour, baking powder, and salt into a bowl, set aside.

With a handheld or standing mixer, beat the butter until creamy.
Add the 1 1/2 cups sugar and continue beating until light and fluffy, about 5 minutes.
Add the eggs, 1 at a time, beating well after each addition.
Add the flour mixture and blend until smooth.

Mix the 3 tablespoons sugar with the cinnamon in a small bowl.
Roll the dough, by hand, into 1 1/2-inch balls. Roll the balls in the cinnamon sugar. Flatten the balls into 1/2-inch thick disks, spacing them evenly on ungreased cookie sheets.
Bake until light brown, but still moist in the center, about 12 minutes. Remove from pan and place on rack to cool.


Friday, May 22, 2009

Ricotta-Parmesan Gnocchi with Brown Butter-Herb Sauce


Ricotta-Parmesan Gnocchi with Brown Butter-Herb Sauce
Makes 8 first course servings
(Halve the recipe for 2 to 3 generous servings)

Ingredients:


3 Tablespoons butter
1 teaspoon chopped fresh sage*
3/4 teaspoon salt
1/4 teaspoon ground black pepper
1 container (15 ounces) ricotta cheese
6 Tablespoons freshly grated Parmesan cheese
3/4 cup chopped fresh parsley
3/4 cup all-purpose flour or as needed

*I swapped out snipped chives in this version; double or triple the amount if using chives.

Melt butter in a medium large (2-quart) saucepan over medium heat; stirring until it turns a deep golden brown. Don't allow to turn dark or burn or it will be bitter.
Remove from heat and add sage, or snipped chives, 1/4 teaspoon salt, and pepper; set aside and keep warm.

In medium bowl, combine ricotta, Parmesan, parsley, and remaining 1/2 teaspoon salt.

Sprinkle flour over ricotta mixture andwork mixture into soft, smooth dough with your hands or a silicone spatula.

If dough is sticky, add some flour. Work dough just until flour is mixed into cheese mixture; don't overwork.

Break off piece of dough and roll into a 3/4-inch-rope on lightly floured surface.,
(If rope doesn't hold together, return to bowl with remaining dough and work in more flour.)

Cut dough rope into 3/4-inch lengths. Place one piece of dough on inside curve of fork tines, gently pressing on dough with thumb as you roll dough along tines. Allow dough to drop off fork, slightly curling in on itself, forming an oval. One side of gnocchi will have ridges and opposite side will have an indentation.

Repeat rolling, cutting, and shaping with remaining dough. (Gnocchi can be made up to 4 hours ahead to this point. Arrange in floured jelly-roll pan; cover and refrigerate.)

To cook:

In 5-quart saucepot, heat 4 quarts water to boiling over high heat. Add half of gnocchi and cook until gnocchi float to the surface, 2 to 3 minutes. With slotted spoon, transfer gnocchi to warm shallow serving bowl. Repeat with remaining gnocchi. To serve, toss gnocchi with sage butter, if desired sprinkle with additional chopped herbs and grated Parmesan cheese.

Adapted from "The All-New Good Housekeeping Cookbook"


Please CLICK HERE to return to Once Upon a Plate


Thursday, May 21, 2009

Savory Herb Muffins ~ Regular or Mini size


The original recipe was from The California Culinary Academy, but I've tweaked it quite a bit to make it more to our liking.

Savory Herb Muffins
The following recipe will make 12 regular size muffins.
However, I usually halve the recipe; in that case it makes 24 mini-muffins (the cups of my mini-muffin tins are 1-ounce capacity each.)

Ingredients:

2 cups Whole-wheat pastry flour, or unbleached white flour
1 tablespoon Baking powder
1 teaspoon Baking soda
½ teaspoon salt
1 Tablespoon fresh oregano, chopped ( or 2 teaspoons dried oregano)
1 Tablespoon fresh thyme leaves (or 2 teaspoons dried thyme)
1 Tablspoon fresh basil, chopped (or 2 teaspoons dried basil)
2 Eggs
1 Egg white
1 cup Nonfat buttermilk
2 tablespoons mildly flavored vegetable oil (I use canola)
2 teaspoons sugar (or 1 Tablespoon honey), less if you like.
¼ cup Grated Parmesan cheese


Additional oil for muffin pan(s), or cooking spray

* Note: Use any herbs you like ~ for this batch I used fresh, snipped chives and fresh thyme leaves (increasing the amounts of each.) Minced garlic or shallot are a nice addition, too.


Method:

Preheat oven to 400 degrees F. Lightly oil or spray a 12-hole muffin tin

Combine flour, baking powder, baking soda, herbal salt substitute, oregano, thyme, and basil in a large mixing bowl.

In another bowl combine eggs, egg white, buttermilk, the 2 tablespoons oil, sugar (or honey), and Parmesan.

Add the liquid mixture to the flour mixture, stirring briefly, then spoon into prepared muffin cups, filling two thirds full.

Bake for 25 minutes (For mini-muffins begin checking at 12 minutes, ovens vary. Mine usually take between 15 and 18 minutes.) Let cool slightly, then remove from tins.


Hope you enjoy! ~Mari (Once Upon a Plate)


Tuesday, May 19, 2009

Indian Fry Bread Tacos ~ Snack Size!


You can fill the "tacos" with any of your favorite meat or vegetable fillings so let your imagination rule. :)

Here is the recipe I use to make the Fry Bread ~ to make them "snack" size, portion the dough and roll it into a small walnut size piece ~ you can roll it out into a flat, round shape on a floured surface with a rolling pin, or do as I do and simply pat and shape with your floured hands. The dough is very soft and easy to work with.

Navajo Fry Bread
Makes 4 regular size, or about 8 snack-size (3-inch diameter)

1 cup unbleached flour
1/4 teaspoon salt
1 teaspoon powdered milk
1 teaspoon baking powder
1/2 cup water

Vegetable oil for frying


Sift together the flour, salt, powdered milk, and baking powder into a large bowl. Pour the water over the flour mixture all at once and stir the dough with a fork until it starts to form one big clump.


Dip your hands in flour; with your hands begin to mix the dough, trying to get all the flour into the mixture to form a ball. I use a fork to begin, then my hands ~ I find it a little less messy that way.

Mix well, until all flour is incorporated, but do NOT knead it. Kneading it will make the Fry Bread tough. The dough ball will be sticky, just sprinkle a little flour on the outside of the ball to make it easier to handle (and pinch pieces as you form them.)


Traditional size Fry Bread: Cut or pinch the dough into four pieces. Using your floured hands, shape, stretch, pat, and form a disk of about 5 to 7 inches in diameter.

Snack-size Fry Bread: Cut or pinch pieces about the size of a small walnut; stretch and shape into a 3-inch diameter round.

Aim for a round shape, but don't worry if they are not perfectly round.

Heat the vegetable oil (about 1-inch deep in a large cast iron skillet or other pot) to approximately 350 degrees F.

---For the snack-size I cook the fry bread one at a time in my "Fry-Daddy" electric fryer.

To fry: Gently and carefully place the formed dough into the oil, be mindful of splatters from the hot oil.

Using a wooden spoon, or metal tongs press down on the dough as it fries so the top is submersed into the hot oil. (I press down in the middle so the dough fries into a cupped shape.)Fry until light brown, and then turn the dough over to fry the other side. (About 3 to 4 minutes on each side for traditional size, a little less for snack size.)

Carefully remove and drain well. I line a rimmed baking sheet with paper towels and place in a warm oven, transferring each little bread to the oven as it is finished frying.

Fry Bread can be served in a number of ways; brushed with butter and drizzled with honey, as a container for your favorite sweet or savory filling, or as an accompaniment to a meal, soup, or salad.

NOTE: In my opinion these are BEST right after they are fried, but here are some hints if you make them ahead:


The fried bread can be kept in a warm (200* F) oven for up to an hour. If you want to make them ahead, fry, cool then refrigerate. To reheat, place on a pan in a single layer in a 350* F oven for 10 minutes or until hot.

I hope you enjoy! :)

If you would like variations of the recipe, you can find them by clicking HERE.

Sunday, May 17, 2009

Naan flatbread, without a Tandoori Oven


Again, I'll explain I am not of Indian descent, nor am I an expert of the cuisine (by ANY means)~ but I adore naan, the delicious, slightly chewy, teardrop shaped bread used to scoop stews and the like.


Authentic naan is baked by literally throwing the flattened bread dough against the hot, vertical oven walls of a traditional Tandoori oven. I have no such Tandoori oven, but one of my sister-in-laws taught me this method which works remarkably well. It's a simple recipe, I urge you to try it to see how easy and delcious it is.


You can make the dough by hand, ( I never have made this recipe by hand), rather I just use the dough cycle of my bread machine, then form the dough, season with the topping and bake.


Naan Flatbread ~ Without a Tandoori oven

Makes 5 pieces of flatbread


Note: I use a kitchen scale for accuracy, so I've listed the amounts in ounces. I haven't tried to convert to cups, but I'll attempt to do so soon.


9-ounces (or 250 ml) all-purpose flour

1/2 teaspoon salt

2 teaspoons sugar

4.5 fluid ounces milk (or 110 to 130 ml)

2 Tablespoons vegetable oil

2 Tablespoons melted butter (for serving)


Optional toppings: minced garlic, chopped scallions/green onions (my favorite), sesame seeds, chopped fresh cilantro/coriander, poppy seeds, etc.


To make dough in bread machine: Place ingredients (except melted butter and optional toppings) in bread machine pan, select dough setting, allow cycle to run, then shape dough and bake.


To make dough by hand: Sift dry ingredients in a large bowl, gradually add in wet ingredients (the milk and oil), until blended. Knead by hand for 8 to 10 minutes until a smooth, soft dough has formed. Place dough in a greased bowl, cover and allow to rest in a warm place for about an hour. Then shape and bake as below.


To shape and bake the dough:


Press any air out of the dough and cut into 5 equal pieces. Dust the rolling surface and rolling pin with flour. Roll each piece out, one at a time, into a thin, teardrop shape about 6-inches by 8-inches.


If you would like to add toppings, firmly press them in to the top surface of the dough with your fingers.


To bake: The bread is actually "baked" under the broiler element of your oven, which simulates the heat of a Tandoori oven.

Place an inverted (bottom side up), heavy duty baking sheet* on the top rack of oven, and adjust oven to "broil". Allow pan to heat until hot. Carefully place one or two naan on the hot sheet, and return to the broiler, watching carefully as they puff slightly and bake. Note! They bake in one or two minutes, so watch very carefully. Remove from pan, brush with butter if desired, and keep warm; repeat with remaining dough.


* I have not used the baking pan method here, instead I use the flat side of my cast iron, rectangular lodge grill to bake the naan. I preheat it under the hot broiler for about 5 minutes and have found this gives perfect results.


If you try this recipe, I hope you enjoy it as much as we do.


CLICK HERE to return to ONCE UPON A PLATE

Friday, May 8, 2009

Diana Kennedy's Chilatas


Chilatas is a textured powder of toasted and ground seeds and nut, seasoned with chile and salt. It is sprinkled over a freshly made corn tortilla or a dish of beans. Delicious sprinkled on salads. It is delicious, healthy, crunchy and addictive.


This version is from Diana Kennedy.


More about Diana Kennedy


Chilatas
Recipe adapted from "My Mexico" by Diana Kennedy Copyright © 1998

Makes: 1 1/2 cups (375 ml) loosely packed


1/3 cup (83 ml) shelled peanuts
1/2 cup (125 ml) sesame seeds
1/2 cup (125 ml) raw, hulled pumpkin seeds
1/8 teaspoon powdered, hot, dried chiles (such as ancho, guajillo, or chipotle powder, or de arbol powder), or a tiny bit more ~ to taste.

1/2 teaspoon or to taste, medium coarse sea salt


Toast each of the seeds separately in a heavy pan*, taking care not to let them get too brown, set aside to cool.

Grind them separately in an electric coffee/spice grinder to a textured consistency.
Mix together with the chile and salt and store in a dry place in an airtight container. It keeps indefinitely in the freezer.


*Note: I prefer to heat the oven to 350* (F), and toast each nut separately on small rimmed trays or metal pie pans.


Watch carefully as they can burn easily. I set the timer for 2 minutes, then stir the nuts. Set the timer again for 2 minutes and watch as the seeds/nuts begin to become fragrant and slightly turn color. The pumpkin seeds usually only take 3 minutes (depending upon the size and thickness (gauge) of the pan you are using.


I just place all of the cool nut/seeds and seasonings in the bowl of the food processor and pulse until the desired texture is reached.


The secret is to add enough salt and chili powder to spike the flavor ~ that's what makes Chilatas so delicious!


Wednesday, May 6, 2009

Easy Cinnamon-Almond Biscotti

Easy Cinnamon Almond Biscotti
(makes about 30)

These are EXCELLENT! However they are not the extra tough-crisp biscotti, but instead have a very nice firm cookie texture.

NOTE: If you follow the recipe below yours will be a pretty medium-golden color. I added an extra teaspoon of Vietnamese Cinnamon to those in the picture at the request of the cinnamon-lover I was making them for. (Personally I prefer the recipe just as written!)

I've made these many times to rave reviews, they make a very nice gift. I always include them in my Christmas Cookie Baskets.

This time I dipped the bottoms in melted chocolate; some in White Chocolate, and some in Semi-Sweet Chocolate, and allowed the chocolate to cool and harden (chocolate-side-down) on silicone baking liners. But they are absolutely delicious plain without the chocolate, too.

If you make them I hope you enjoy them as much as my family and friends do.

Ingredients:

¾ cup butter, softened
1 cup granulated sugar
2 eggs
1 ½ teaspoons vanilla extract
2 ½ cups all-purpose flour
1 teaspoon cinnamon
¾ teaspoons baking powder
½ teaspoons salt
1 cup sliced or slivered almonds
Sanding sugar or regular sugar and more cinnamon for rolling logs

Directions:

Preheat oven to 350 degrees F (175 degrees C).

Line a sheetpan with parchment paper.

In a medium bowl, cream together butter and sugar until light and fluffy. Beat in eggs and vanilla. Sift together the flour, cinnamon, baking powder, and salt; mix into the egg mixture. Stir in the almonds. Sprinkle the sugar/cinnamon mixture evenly over the parchment lined baking pan.

Divide the dough equally into two (while it's still in the bowl) and place on the parchment paper forming and rolling them into logs (about 12 inches long) making sure they're covered with the sugar/cinnamon mixture. Don't worry about removing any excess sugar, from the baking pan, it's fine to leave it on the parchment.

Leave them in a roll shape and DON'T flatten. Place logs on baking sheet, and bake in a preheated oven, for 30 minutes, or until the edges are golden.

Remove from oven to cool just 5 minutes (no longer) on the pan.

REDUCE oven temperature to 250 degrees. Use a chefs knife to carefully slice, pushing straight down, (rather than sawing) the loaves, diagonally, into ½ inch thick slices.

Return the slices to the baking sheet on their sides. Bake for 10 minutes, at 250 degrees, turn pieces over and cook 10 more minutes on the other side.

Turn them upright and TURN OFF the oven and just leave them sit in the oven for an additional 4 to 5 HOURS or longer. Cool completely, and store in an airtight container at room temperature. They stay fresh for a month if stored properly. such as an airtight tin, lined with waxed paper. These freeze exceptionally well.


Adapted from Allrecipes


Grilled Shrimp with Saffron-Chipotle Cream Salsa


Grilled Shrimp with Saffron-Chipotle Cream Salsa
Servings: 6

I N G R E D I E N T S

2 pounds large shrimp (about 36 shrimp), I butterfly and flatten them in the shell so the marinade can penetrate.

At least 6 bamboo skewers (I use 2 parallel skewers per serving, for more stability.


Marinade ingredients:


4 to 6 limes (depending upon size)
1 tablespoon kosher salt
1/2 tablespoon white pepper
1 tablespoon garlic powder (or 4 to 5 fresh garlic cloves, minced)
2 tablespoons chile powder, such as ancho powder or chipotle powder


To serve: Saffron Chipotle Salsa (recipe below)


Directions:


Make the marinade:

Mix lime juice, salt, pepper, garlic and chile powder in a heavy zip-lock bag. Add the shrimp and marinate (with shell intact) for one hour in the refrigerator. After marinating, thread 6 shrimp on the skewers.


Prepare & preheat a grill; outdoor, stovetop (or broiler)


Grill each skewer for about 3 minutes on each side, or until the shrimp turn pink. After all shrimp are cooked, serve them with the Cream Salsa. Shrimp may be peeled before serving ~ but for a casual meal I serve them right from the grill. Serve with the saffron chipotle salsa.

Chipotle-Saffron Cream Salsa
Servings: 6
NOTE: Below is the recipe the way it was shared, my changes are listed beneath the recipe.

I N G R E D I E N T S

1 tablespoon extra virgin olive oil
1 tablespoon butter
1 chipotle chile in adobo sauce, mashed
1 cup heavy cream
2 cups good white wine
1/4 tablespoon ground saffron
Salt and pepper

Directions:

Heat the olive oil and butter in a frying pan. Add the chipotle and heavy cream to the pan. When the mixture comes to a boil add the white wine, saffron, and salt and pepper. Allow to come to a boil again, lower the heat and leave at low heat for 2 more minutes. Keep the salsa warm until ready to serve.

My Notes:
I prefer a thicker sauce~ Following the above directions, I change the amounts of ingredients:
  • Reduce wine to 1/4 cup
  • Reduce saffron to 1/4 teaspoon (I use whole saffron; crumbled, not ground)
  • If you prefer a milder salsa use 1/2 of a chile instead of whole.

I allow the sauce to simmer over very low heat to thicken for several minutes, stirring occasionally with a silicone spatula. Sauce may be strained/sieved to refine sauce if desired.

Recipes adapted from Zivaz Mexican Bistro

Monday, May 4, 2009

Fresh Strawberry Granita


Fresh Strawberry Granita
Adapted from Bon Appétit May 2005

1 cup hot water
3/4 cup sugar
2 tablespoons fresh lemon juice
3 cups halved hulled strawberries (1 pound whole berries) plus additional berries for garnish

Add first 3 ingredients to food processor bowl fitted with the metal blade; process until sugar dissolves.
Add 3 cups strawberries in processor until smooth.
Add sugar syrup and blend until combined.
Pour mixture into 13x 9x 2-inch nonstick metal baking, or tempered glass pan (such as Pyrex, or Corningware.)*
Freeze until icy around edges, about 25 minutes. Using fork, stir icy portions into middle of pan. Freeze until mixture is frozen, stirring edges into center every 20 to 30 minutes, about 1 1/2 hours.
Using fork, scrape granita into flaky crystals. Cover tightly and freeze. (Can be made 1 day ahead. Keep frozen.)
To serve: scrape granita into bowls, garnish with additional strawberries if desired.
Notes:
Recipe can easily be halved and frozen in a smaller pan.
(I used a large square "Glad" container with lid)
I streamlined the original recipe and simply prepared the mix in the food processor bowl.
I substituted 1/2 of the sugar with Spenda to cut the sugar content.
It's a light, refreshing treat ~ and no fat. :)

Parmesan-Pine Nut Crackers


Another recipe from one of my current favorite cookbooks ~


Essentially a shortbread recipe flavored with good Parmesan cheese.

I made mine with aged Parmesano Reggiano which is drier than younger Parmesan.

If you use the younger, moister parmesan your crackers will spread more than mine did.

Either way, the flavor and texture is divine ~ perfect with your favorite beverage or as a good offering on the cheese or fruit platter.

In Peggy's version each cracker is adorned with a single pine nut ~ I made some that way, and some with tiny tips of fresh thyme, others with a pinch of Piment d'Espelette (the spicy red pepper powder from the French Basque country.) Since I changed the recipe, I renamed them:


Crisp, Buttery Parmesan Crackers

Makes about 5 dozen depending upon how you slice the crackers, and how thick the logs are.
(I halve the recipe)

2 cups all-purpose flour
1/2 teaspoon salt
Dash of cayennne pepper
1 cup (2 sticks) butter, at room temperature
1 pound Parmigiano-Reggiano cheese, grated
60 pine nuts (1/4 ounce)

Sift the flour and salt together in a bowl. In a separate bowl cream the butter and cayenne together with an electric mixer; add one cup of cheese at a time until all is incorporated and well blended.

Add in the flour mixture and mix well.

Shape the dough into 3 logs, 1 1/2 -inch diameter each. Wrap in plastic cling film and refrigerate until firm.

When ready to bake ~ preheat oven to 400* (F)

Remove one log from refrigerator (keep the others refrigerated until ready to slice and bake), cut the log into 1/4-inch-thick-slices.

Place on ungreased baking sheets, leaving at least 1/2 inch between the slices.

Press a whole pine nut into the center of each slice. Bake until light brown (about 8 minutes.)

These can burn easily so I begin watching them at about 5 minutes. Cool on wire racks.


Delicious freshly baked, or can store in an airtight container.

You can form the cheese dough logs a day or two ahead and simply slice and bake as you want to use them.


If you try them, I hope you like them, too.


Psst... It's a terrific cookbook!
Check it out:


Please CLICK HERE to return to Once Upon a Plate.

Tuesday, April 28, 2009

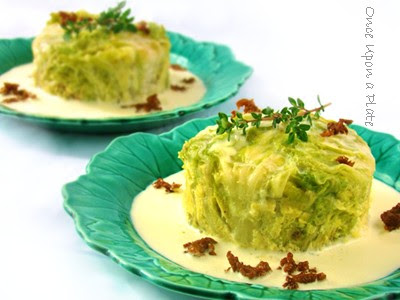
Gnafron


Gnafron
4 to 6 servings, depending upon the size of ramekins used

An unusual dish from Lyon, France; a tender flavorful flan baked within leafy greens, and served with a delightful Garlic Cream.


Perfect for a light lunch, dinner, or an appetizer ~ don't limit the delicious Garlic Cream to only this recipe; it is fabulous on vegetables and simply prepared chicken or fish, too!

Adapted from “Simple Soirees” by Peggy Knickerbocker
Recipe yields 6 ramekins

For the Gnafron

2 tablespoons extra-virgin olive oil
2 tablespoons unsalted butter
1 carrot, diced
½ pound andouille sausage or other distinctively flavored, spicy sausage, finely chopped
1 medium onion, minced
2 teaspoons fresh thyme leaves or 1 teaspoon dried thyme
1 bay leaf
Salt and freshly ground black pepper
Splash of white wine
1 Napa cabbage, separated, tough parts of the core removed (16 to 20 leaves)*
2 tablespoons unsalted butter for greasing the ramekins
4 large eggs
¼ cup heavy cream

For the Garlic Cream


3 cloves garlic
Pinch of sugar
Pinch of salt
Splash of white wine
½ cup heavy cream

To make the Gnafron~

Melt the butter in the olive oil in a heavy saucepan, add sausage, carrot, onion, thyme and bay leaf. Season with salt and pepper. Simmer slowly for 15 minutes; as the mixture becomes dry add the white wine. Allow to simmer for another 5 to 10 minutes; remove pan from hat and allow the sausage mix to cool for about 10 minutes.

While the sausage mix is cooking, bring about 4 cups of water to a boil in a deep skillet or pot. Salt generously, reduce heat to simmer and blanch the cabbage leaves (tender parts only)* a few at a time. Remove with tongs and allow to drain and cool on clean kitchen towels.

Butter interiors of 6 small ramekins, or soufflé dishes with butter. Line the dishes with cabbage
leaves allowing them to overlap so when the egg-sausage mixture is spooned into them they can be folded over to enclose the filling.

In a medium-sized bowl, beat the eggs with the cream, add a bit of salt and pepper. Stir the
cooled sausage mixture; mix well. Divide the mixture among the lined ramekins and fold the
overlapping leaves over the top. Do not be concerned if the mixture leaks out around the leaves.

Preheat oven to 350* (F)

Place the ramekins in a deep baking pan, large enough to hold them all. Pour warm water around them so it comes ¾ of the way up the sides of the ramekins.

Place the pan in the oven and bake for about 1 hour (begin checking at 30 minutes; mine were done in 45 minutes. When they are done, the Gnafron will be set and the top will be firm to the touch. If the tops begin to brown place a sheet of foil loosely over the tops. It’s okay if the tops get golden brown.

To make the garlic cream:

While the Gnafron bakes, make the garlic cream. In a small heavy pot combine the garlic, sugar, salt and splash of water; cook over medium low heat for a few minutes. Add a splash of dry white wine; continue to cook for about 5 minutes. Turn off the heat and allow the garlic to steep in the cream until the Gnafron come out of the oven. Reheat the garlic cream over low heat (it will be thin); remove and discard the garlic.

To serve, run a knife around the sides of the ramekins to loosen the mixture. Turn out onto a platter or individual plates (or serve right in the ramekins.) Serve with a little garlic cream over the tops.


*Note on blanching the cabbage leaves: I blanch the leaves whole, then when they have drained and cooled, cut a “v” to remove the tough core part (center rib) of each leaf (cutting them out afterwards makes the leaves easier to handle and not as apt to tear while blanching.)


Thursday, April 23, 2009

Deep Dark Mahogany Glazed Wings


Deep Dark Mahogany Glazed Wings

1 pound (or more) chicken wings, disjointed with tip sections reserved for another use (or discarded)
For the baking sauce, may be doubled or tripled, etc.
(I usually double, for extra sauce):
6 Tablespoons Dark Soy Sauce (Kikkoman, for example)
2 Tablespoon Dry, Pale Cocktail Sherry (not sweet sherry)
3 (or more) Tablespoons granulated sugar
2 to 3 cloves garlic, smashed
3 sliced, peeled fresh ginger (about the size of a quarter)
1 to 2 teaspoons vegetable oil

Preheat oven to 400 * (F)

Method: Line a shallow baking pan with foil, and spray with non-stick cooking spray (or brush lightly with vegetable oil), to facilitate easy clean up.

Combine all sauce ingredients in a saucepan and bring to a boil, cook just until sugar dissolves. Allow to cool a bit.

Arrange wing pieces in a single layer on the foil lined pan. Pour the sauce mixture over all, and turn to coat pieces to coat evenly.

Place the pan of wings in the hot oven, turning from time to time, and spoon
sauce over to keep them moist.

Bake for 30 to 45 minutes until completely cooked through and tender.

May be placed under a hot broiler for a few minutes if you like crisper skin.
Watch carefully, as they burn easily.

Serve hot, warm, or at room temperature, garnished with thinly sliced scallions,
chives, and/or a sprinkle of sesame seeds.

Wednesday, April 22, 2009

Gaufrettes ~ French-style Waffle Cookies with Salted Caramel Filling


Gaufrettes ~ French-style Waffle Cookies
with Salted Caramel-Cinnamon Filling

(The number of cookies this will yield depends upon the diameter of your pizelle or stroopwafel
iron.)


I find this dough easiest to mix in my stand mixer, the first stage requires several minutes of beating, then the addition of the flour makes the dough very stiff ~ so I allow the machine to do the work.

INGREDIENTS:

3 large eggs
1 cup sugar
1 teaspoon vanilla extract
1 cup (2 sticks, or 8 ounces) unsalted butter, melted and cooled to lukewarm
4 cups all-purpose flour

Directions:

Beat the eggs with the sugar and vanilla until the mixture turns fluffy and very pale, and forms a ribbon that holds its shape.

Add the melted butter and mix well.

Sift in the flour, a little at a time, and mix well to form a smooth dough.

Next, allow the dough to rest. (I leave it right in the mixing bowl and cover the top of the bowl with a clean, barely damp kitchen towel) Allow dough to rest for about 2 hours at room temperature (I've used it at 1 1/2 hours with no problem.)

With your hands, roll the dough into balls, 1-1/2 inches in diameter

Bake in a hot pizelle iron (or stroopwafel iron) he smallest grids until the cookies are golden brown and crisp. Let the cookies cool on a rack and fill when cool; store in airtight containers.

Note: These wafers are delicious without the filling, too.

For The Filling:

1 1/2 cups packed brown sugar
1 cup unsalted butter
1 teaspoon ground cinnamon
6 tablespoons dark corn syrup (I've used light corn syrup; no notable difference)
1/2 cup finely ground hazelnuts, optional*

Coarse sea salt (optional)

To Make Filling:

In a saucepan boil the brown sugar, the remaing one cup of the butter, cinnamon, and dark corn syrup until it reaches the soft ball stage (234-240 degrees F 112 -115 degrees C). Stir in ground hazelnuts at this point, if using.

To assemble the cookies:

Best to spread the filling and assemble one at a time, to assure top wafer wil adhere to the filling.
Allow cookies to cool, spread warm filling on one wafer; sprinkle a tiny pinch of coarse sea salt over filling (if desired), top with second wafer. Continue until all wafers are used. When cool store in an airtight container.


.

Tuesday, April 21, 2009

Greek Style Baby Back Pork Ribs ~ From My Friend Ann


If you like pork ribs, I'll bet you'll love these as much as my family and I do!

The recipe is from my friend Ann, at Thibeault's Table .
You must check out Ann's blog ~ it is loaded with excellent recipes.

Thibeault's Table Greek-style Baby Back Pork Ribs

Home Cookin Chapter: Recipes From Thibeault's Table

1 or 2 Racks of Baby Back Pork Ribs
2 to 3 garlic cloves
dried oregano
Juice of 1 to 2 lemons
Lemon zest (Optional)
salt and pepper

Mince garlic and press with back of knife to turn into a paste. (or use a microplane)

Rub ribs with garlic, rub on oregano, salt and pepper and lemon zest ifusing. Squeeze juice of whole lemons over ribs a few hours before cooking.

Note: These can be marinated earlier in the day or overnight, but do not add the lemon juice until a few hours before grilling or the lemon will change the texture of the meat.

If using a gas or grill: Heat grill to high (both sides) Place ribs on one side of grill and turn that side off.

If using a charcoal grill: Use the indirect method of grilling (meat not directly over the fuel source.)

Cook, turning occasionally until ribs are tender.

Each grill will vary, but on Ann's (and my) grill (using the INDIRECT cooking method)
they take about 45 minutes to an hour depending on the size of the ribs.

They may take a little less time, or a little longer; depending upon your grill.

Sunday, April 19, 2009

Italian Wedding Soup ~ Barefoot Contessa's


We really like this one ~ very satisfying, yet not too filling. In a word? Delicious!


Italian Wedding Soup
Adapted from : "Barefoot Contessa Back to Basics"
8 servings

Note: I have substituted ground turkey, and turkey sausage in this recipe with great success. I use orzo pasta.

Ingredients
To make the meatballs:
3/4 pound ground chicken
1/2 pound chicken sausage, casings removed
2/3 cup fresh white bread crumbs
2 teaspoons minced garlic (2 cloves)
3 tablespoons chopped fresh parsley leaves
1/4 cup freshly grated Pecorino Romano
1/4 cup freshly grated Parmesan, and more for serving
3 tablespoons milk
1 extra-large egg, lightly beaten
Kosher salt and freshly ground black pepper


For the Soup:


2 tablespoons olive oil
1 cup minced yellow onion
1 cup diced carrots (3 carrots), cut into 1/4 inch pieces
3/4 cup diced celery (2 stalks), cut into 1/4 inch pieces
10 cups homemade chicken stock
1/2 cup dry white wine
1 cup small pasta (I use orzo, but any tiny pasta will do)
1/4 cup minced fresh dill
12 ounces baby spinach, washed and trimmed


Directions


Preheat the oven to 350 degrees F.
To make the meatballs~ place the ground chicken, sausage, bread crumbs, garlic, parsley, Pecorino, Parmesan, milk, egg, 1 teaspoon salt, and 1/2 teaspoon pepper in a bowl and combine gently with a fork. With a teaspoon or small portion scoop, drop 1 to 1 1/4-inch meatballs onto a sheet pan lined with parchment paper. (Makes about 40 meatballs.) No need to strive or perfection, they needn't be perfectly round. Bake for 30 minutes, until cooked through and lightly browned. Set aside.


While meatballs ar baking, prepare the soup broth: heat the olive oil over medium-low heat in a large pot. Add the onion, carrots, and celery and saute until softened, about 5 minutes, stirring occasionally. Add the chicken stock and wine and bring to a boil. Add the pasta to the simmering broth and cook for 6 to 8 minutes, until the pasta is tender. Add the fresh dill and then the meatballs to the soup and simmer for 1 minute. Taste, and add salt and pepper if needed; I always add a big squeeze of fresh lemon juice to heighten the flavors.


Stir in the fresh spinach and cook for 1 minute, until the spinach is just wilted.


Ladle into soup bowls and sprinkle each serving with extra grated Parmesan. Really good with garlic bread!


Friday, April 17, 2009

White Gazpacho ~ Slightly Sweet & Tangy


White Gazpacho ~ Slightly Sweet & Tangy
Makes 4 cups


I made this for a Garden Party Buffet we gave last summer; it was perfectly refreshing and very popular. It's also vegetarian friendly.


Different than other white gazpachos than I've had, it is slightly sweet from the grapes, and tangy from the mild vinegars. The almonds and bread add body; I served grape halves and toasted Spanish Marcona almonds on the side so each person could add their own. It's an excellent selection for a party or other gathering as it can be made ahead and kept in the refrigerator until serving time. Keeper!

4-5 slices French bread, (or other good, non-sweet white bread) about 1/2" thick
2 cups water
1/4 of a medium size yellow onion, peeled and chopped (or 6 scallions, white part only)
2 medium cucumbers, peeled and coarsely chopped (English, or regular)
1/2 cup champagne vinegar *(
1/2 cup almond or mildly flavored olive oil
3 tablespoons sugar
2 teaspoons kosher salt
1/2 teaspoon white pepper
1/2 pound green grapes, rinsed and halved, garnish (but don't omit!)
1/2 cup sliced almonds (or blanched whole almonds -or almond halves), toasted

Remove crusts from bread slices. Cut bread into 1/2" cubes to make 2 cups of bread cubes. Put the bread and water into blender with the onion, cucumber, vinegar, oil, sugar, salt and white pepper. Puree until completely smooth.

Chill soup until it is very cold (at least two hours).
Serve it in cold bowls or mugs. Garnish with the green grapes and toasted almonds. Offer more, if desired so each person can add their own.

*For the vinegar: You may use 1/4 cup sherry vinegar, plus 1/4 cup good white wine vinegar, not plain white vinegar as it is too strong. Alternately, substitute 1/2 cup plain (unseasoned) Rice Vinegar.

Note: There are many, many versions of t )his recipe floating around the internet, the one I used in August was inspired by Panera Bread's recipe.